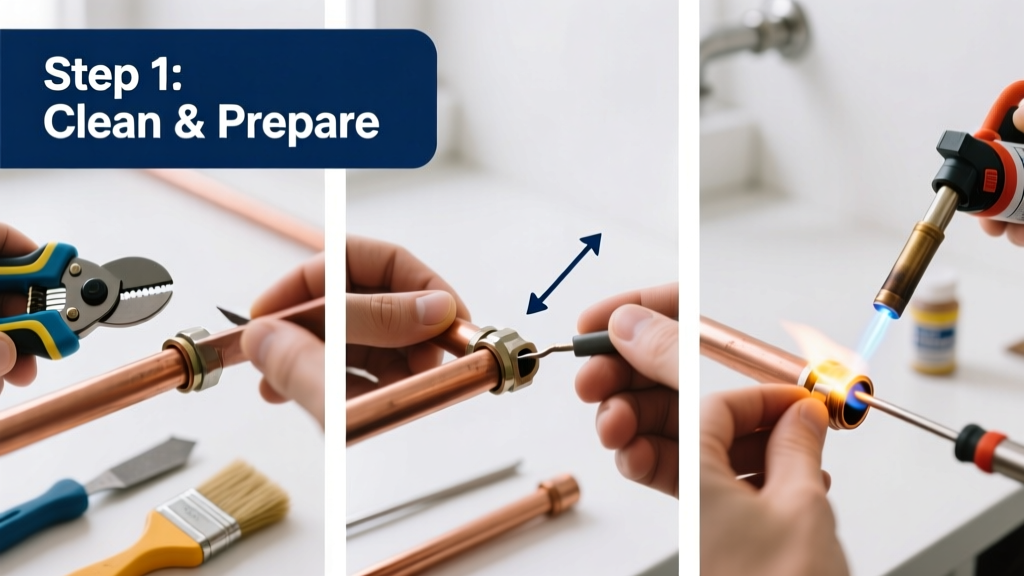
Soldering copper pipe is a foundational plumbing skill that lets you repair leaks, add fixtures, or reroute lines in kitchens, bathrooms, or laundry rooms. It’s rated intermediate—easier than gas line work but demands attention to detail and heat control. With practice, a simple 1/2-inch joint takes under 5 minutes; a full 3-joint repair averages 20–30 minutes.
Overview
| Skill Level | Time Required | Tools Needed | Estimated Cost |
|---|---|---|---|
| Intermediate (requires hand-eye coordination and flame awareness) | 15–45 minutes per joint, depending on access and experience | Torch, flux, solder, emery cloth, tube cutter, deburring tool | $28–$65 (reusable tools + consumables for 10–15 joints) |
Tools & Materials
| Item | Quantity | Notes |
|---|---|---|
| Copper tubing (Type L or M, 1/2" or 3/4") | As needed | Type L is standard for residential water lines; M is thinner and fine for low-pressure runs |
| Lead-free solder (95/5 tin-antimony or 96/4 tin-silver) | 1–2 spools (1 lb) | Avoid 50/50 lead-tin solder—it’s banned for potable water by the Safe Drinking Water Act |
| Plumber’s flux (paste, not acid-based) | 1 small jar | Look for NSF-61 certified flux—non-corrosive and safe for drinking water |
| Propane or MAPP gas torch with adjustable flame | 1 | MAPP burns hotter (3,730°F vs. propane’s 3,600°F), speeding up heating on larger pipes |
| Tube cutter (rotary style) | 1 | Produces cleaner cuts than hacksaws—critical for tight, leak-free joints |
| Emery cloth (120–180 grit) or dedicated pipe cleaning brush | 1 roll or brush | Removes oxidation without scratching deeply—never use steel wool |
| Deburring tool or utility knife | 1 | Removes sharp inner ridges after cutting; prevents flow restriction and turbulence |
Step-by-Step Instructions
1. Cut and Prepare the Pipe
Use a tube cutter to make a square, burr-free cut. Rotate the tool evenly until the pipe severs cleanly—don’t force it. Then, use a deburring tool or knife to remove the inner ridge and emery cloth to clean both the pipe end and fitting’s interior for 1 inch. Wipe away dust with a clean rag. Warning: Never skip cleaning—oxidation or oil prevents solder from adhering, causing cold joints that leak under pressure.
2. Apply Flux Evenly
Using a small acid brush or fingertip, coat the cleaned pipe end and inside of the fitting with a thin, uniform layer of flux. Don’t over-apply—excess flux can ball up when heated and trap air, creating pinhole leaks. According to the Copper Development Association’s 2022 installation guide, “Flux should be visible but not dripping—think of spreading butter, not frosting.”
3. Assemble and Heat the Joint
Slide the pipe into the fitting until it seats fully (you’ll feel a slight stop). Hold steady with pliers if needed. Ignite your torch and adjust to a blue, cone-shaped flame. Heat the fitting—not the pipe—starting at the top and moving clockwise. Focus on the thickest part: the fitting’s shoulder. When the flux bubbles and turns clear (not brown or black), the joint is near soldering temperature.
4. Feed and Finish the Solder
Touch the solder wire to the opposite side of the joint from the flame. If the pipe is hot enough, the solder will melt instantly and get drawn into the gap by capillary action. Rotate the pipe slightly to ensure even ring formation. Remove heat and solder simultaneously. Let cool naturally—no water quenching. Wait at least 2 minutes before testing with water.
Pro Tips
Even seasoned DIYers misjudge heat or skip prep. Here’s what separates reliable joints from time bombs:
- Test fit first—dry-assemble all pieces to confirm alignment and length before fluxing.
- Work in open, ventilated areas: solder fumes contain zinc oxide and rosin vapor—OSHA recommends local exhaust ventilation for repeated use.
- Keep a damp rag nearby to cool adjacent fittings or shut-off valves that shouldn’t heat past 250°F.
“A cold joint looks dull, lumpy, or only partially filled—and it will fail within weeks. If the solder doesn’t flow smoothly around the entire circumference, reheat and refeed. There’s no shame in a second pass—only in turning the water back on too soon.”
— Mike R., Master Plumber and instructor at the United Association Training Center (2023)
Common mistakes include overheating (melting the solder before the joint reaches temp), using dirty flux brushes (cross-contaminates with old flux residue), and failing to wipe excess solder—leaving blobs that corrode over time.
What temperature does copper need to reach to solder?
Copper must hit 350–450°F for lead-free solder to flow. That’s well below copper’s melting point (1,984°F), but high enough that touching the pipe bare-handed causes instant burns. Use a temperature-indicating marker like Tempilstik® 400°F (available at plumbing supply houses) for precise verification—especially when soldering near PVC or PEX.
Can I solder copper pipe with water still in the line?
No—water absorbs heat and prevents the joint from reaching soldering temperature. Even a small puddle will cause a cold joint. Shut off the main valve, open the lowest faucet to drain, then use a wet/dry vac to pull residual water from vertical runs. For stubborn sections, insert a bread plug (a small piece of white bread) into the pipe—it blocks flow temporarily and dissolves harmlessly once water returns.
Why did my solder bead up instead of flowing?
Beaded solder means contamination or insufficient heat. Re-clean the surfaces with fresh emery cloth, re-apply flux, and verify your flame is focused on the fitting—not the pipe. If it still beads, the copper may be coated with silicone sealant or pipe thread compound from prior work—both prevent adhesion.
How long should I wait before pressurizing the line?
Wait at least 2 minutes for 1/2-inch pipe, 5 minutes for 3/4-inch. The joint must solidify fully—rushing causes microfractures. Then turn water on slowly and check for weeping at every joint. A hairline leak often appears as a tiny silver trail—not a drip—under magnification.
Do I need to sand or flux plastic-to-copper transitions?
No—those require mechanical fittings like SharkBite or compression adapters. Soldering won’t bond to plastic, and heat damages PVC, CPVC, or PEX. Always use transition fittings rated for your system’s pressure and temperature—see our guide on how to connect copper to PEX for compatible options.
Is flux required for every joint—even if the pipe looks shiny?
Yes. Surface shine doesn’t guarantee cleanliness. Microscopic oils from skin contact, airborne dust, or factory lubricants inhibit solder flow. The U.S. EPA estimates that 14% of household water usage is from leaks—including those caused by improperly soldered joints—so skipping flux isn’t worth the risk. Always flux, always clean.
Soldering copper pipe isn’t magic—it’s method, muscle memory, and respect for heat and chemistry. Start with scrap pipe, master one joint type (like a straight coupling), then build to elbows and tees. Once you’ve made five flawless, leak-free joints, you’ll know it’s not just technique—you’ve earned the torch. For related skills, see our guides on how to replace a shower valve and how to fix a leaky faucet.