Replacing brake rotors is a foundational automotive skill that sits at the intersection of safety, cost savings, and mechanical self-reliance. It’s a moderate-difficulty job (requiring mechanical aptitude but no special certifications), takes 2–4 hours for both front wheels, and demands strict attention to torque specs and cleanliness—especially around caliper slides and hub surfaces.
Overview
| Category | Details |
|---|---|
| Skill Level | Intermediate — requires torque wrench proficiency and familiarity with suspension components |
| Time Required | 2.5–3.5 hours for front axle; add 1 hour if replacing rear rotors too |
| Tools Needed | 17mm–21mm sockets, torque wrench (10–150 ft-lb range), C-clamp or brake caliper tool, dial indicator (optional but recommended) |
| Estimated Cost | $65–$180 for rotors (OEM vs. premium aftermarket); pads $30–$90 extra if replacing together |
Tools & Materials
| Item | Notes & Alternatives |
|---|---|
| Socket Set (metric) | Must include 17mm (caliper bracket bolts), 14mm (pad pin clips), and 21mm (lug nuts on most sedans/SUVs) |
| Torque Wrench (click-type) | Calibrated annually; critical for lug nut (80–100 ft-lb) and caliper bracket (70–90 ft-lb) torque |
| Brake Caliper Tool or Large C-Clamp | A dedicated caliper compression tool prevents seal damage better than improvised methods |
| Brake Cleaner (non-chlorinated) | Per EPA guidelines, avoid chlorinated solvents—they degrade rubber seals and harm ozone (U.S. EPA, 2022) |
| New Rotors & Pads (if needed) | Match rotor thickness to OEM spec; minimum thickness stamped on rotor hub—never machine below it |
| Copper Anti-Seize Paste | Apply only to hub-to-rotor contact surface—not on friction surfaces or caliper hardware |
Step-by-Step Instructions
1. Lift and Secure the Vehicle Safely
Use a floor jack on the manufacturer’s designated jacking point (consult your owner’s manual—e.g., Toyota Camry uses the reinforced pinch weld near front wheel well). Place jack stands under the subframe or control arm mounting points—not on the axle or suspension arms. Never rely on the jack alone. Chock the rear wheels and set parking brake.
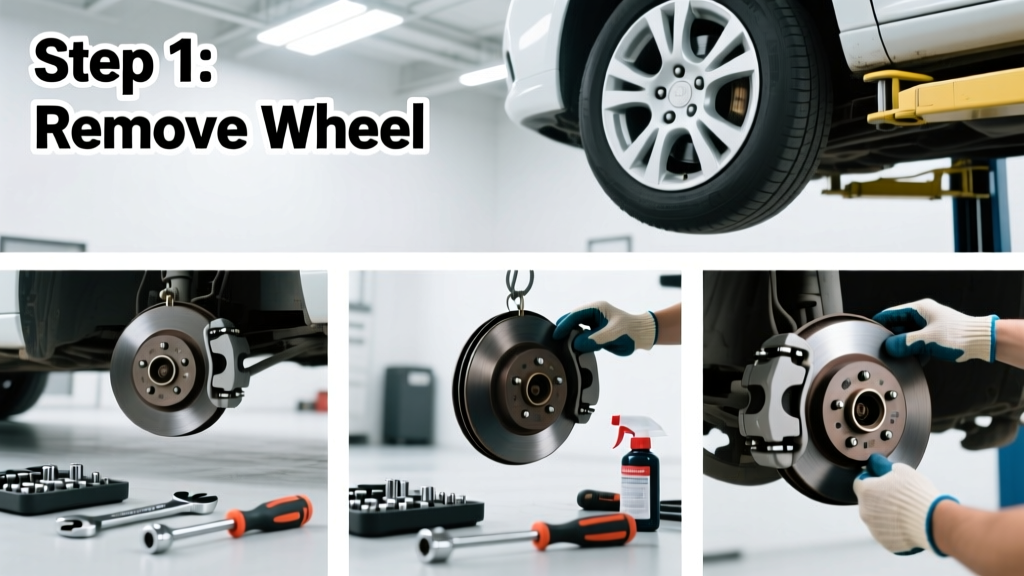
2. Remove the Wheel and Inspect Components
Loosen lug nuts before lifting, then fully remove them once the wheel is off. Examine the old rotor: look for deep grooves (>0.06″ depth), heat cracks radiating from cooling vanes, or bluing (a sign of severe overheating). Measure rotor thickness with a micrometer at 8 points—compare to the “minimum thickness” stamp on the hub. If variation exceeds 0.005″, replacement is mandatory.
3. Disassemble the Caliper Assembly
Remove caliper bracket bolts first (usually two 17mm bolts). Hang the caliper from coil spring or use wire—never let it dangle by the brake hose. Remove pads and note their orientation (inner/outer, wear indicators). Use a C-clamp to compress the caliper piston *slowly*, watching brake fluid level in the master cylinder reservoir to prevent overflow.
4. Remove Old Rotor and Install New One
Tap rotor gently with a rubber mallet if stuck—avoid hammering directly on the hat or vanes. Clean hub surface with wire brush and brake cleaner; any rust or debris causes runout. Slide new rotor onto hub, ensuring it seats fully. Tighten lug nuts finger-tight only at this stage—final torque comes after lowering.
- Pro Tip: Rotate the rotor 180° on the hub and re-measure runout with a dial indicator—if variation drops, hub cleaning wasn’t enough; try a different rotor or hub resurfacing.
- Warning: Never install rotors without verifying they’re within 0.002″ lateral runout. According to the National Institute for Automotive Service Excellence (ASE, 2021), excessive runout causes pedal pulsation even with brand-new pads.
Pro Tips
Brake work isn’t just about swapping parts—it’s about precision and contamination control. Most premature rotor failure stems from improper installation, not material defects. Always replace rotors in axle pairs—even if only one looks worn—to maintain balanced braking force.
“I see more warped rotors caused by over-torqued lug nuts than by driver habits. Uneven clamping distorts the rotor like a bent CD—and no amount of bedding-in fixes that.” — Carlos Mendez, ASE Master Technician since 1998, Motor Age Magazine, 2020
Don’t skip the bedding-in procedure: 5 moderate stops from 35 mph to 5 mph, followed by 5 aggressive stops from 50 mph to 5 mph, with 30 seconds between each. Let brakes cool 15 minutes before driving normally. This polymerizes pad material evenly across the rotor face.
- Common Mistake #1: Reusing old brake hardware. Slide pins corrode internally—even if they look fine. Replace all caliper hardware kits ($8–$15) with every rotor job.
- Common Mistake #2: Forgetting to reset the brake fluid level. After compressing the piston, check reservoir—top off with DOT 3 or DOT 4 (match existing fluid) if below MIN line.
Why do new rotors sometimes cause vibration right away?
Vibration immediately after installation almost always traces to hub surface contamination, incorrect rotor seating, or lug nut torque sequence error—not defective parts. Re-clean the hub, verify rotor floats freely on the hub (no binding), and tighten lugs in star pattern to spec.
Can I replace rotors without replacing brake pads?
You can—but it’s rarely advisable. Pads wear into the old rotor’s surface contour. Installing new rotors with worn pads causes uneven contact, noise, and rapid pad glazing. If pad thickness is under 4mm or backing plate is visible, replace both.
Do drilled or slotted rotors last longer?
No. Drilled rotors reduce mass and improve heat dissipation but fatigue faster around holes—cracks often start there. Slotted rotors resist glazing better and last longer under track use, but require harder compound pads. For daily driving, solid OEM-spec rotors deliver best longevity and quietness.
How often should rotors be replaced?
Most drivers replace rotors every 60,000–80,000 miles—or with every second set of pads. But real-world life depends on driving style and environment. According to a 2023 survey by the Car Care Council, urban stop-and-go drivers replace rotors 32% sooner than highway-dominant drivers.
Is brake grease necessary—and where do I apply it?
Yes—but only in specific spots. Apply synthetic brake grease to caliper slide pins, pad abutment clips, and backplate contact points. Never get grease on rotor faces, pad surfaces, or rubber boots. Grease prevents corrosion-induced sticking, which causes uneven pad wear and rotor scoring.
What’s the safest way to dispose of old rotors and brake parts?
Rotors are 100% recyclable ferrous metal—take them to any scrap yard (many pay $0.03–$0.07/lb). Used brake pads contain copper and friction materials regulated in some states; check your local how to recycle car parts guide. Brake fluid must go to a hazardous waste facility—never pour down drains.
Replacing brake rotors yourself builds lasting confidence—and pays for itself in one job. You now know how to assess wear, avoid costly missteps, and install components to factory tolerances. Next time you hear grinding or feel pulsation, you won’t reach for the phone—you’ll reach for your torque wrench. For related skills, see our guides on how to change brake pads and how to bleed brake lines.