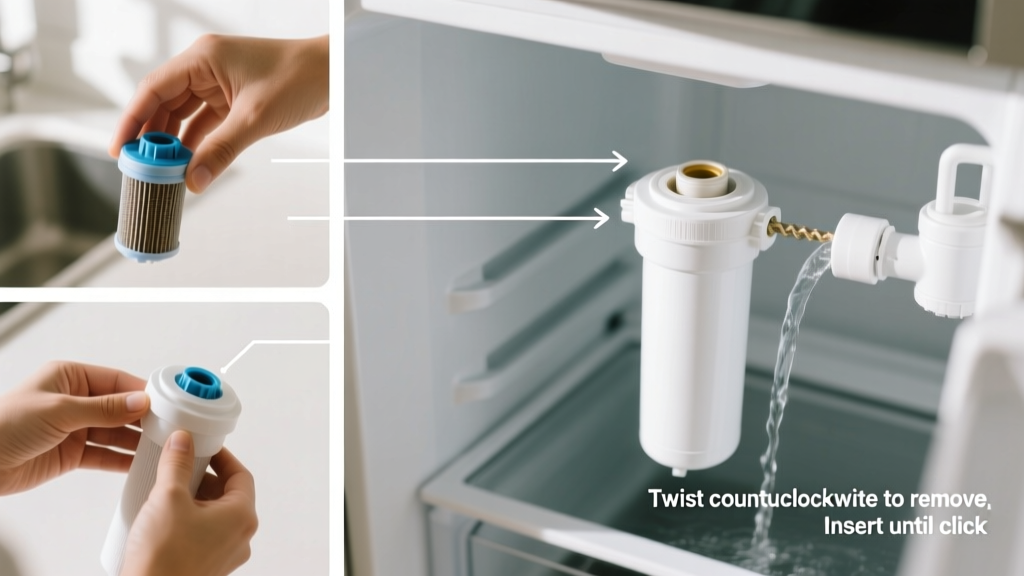
Replacing your refrigerator’s water filter is a simple maintenance task most homeowners can do in under five minutes—no tools required for most models. It’s rated beginner-level, but skipping it risks reduced water flow, off-tastes, and potential damage to the ice maker. According to the U.S. EPA, 14% of household water usage is from leaks and inefficient appliances—many tied to clogged or expired filters.
Overview
| Skill Level | Time Required | Tools Needed | Estimated Cost |
|---|---|---|---|
| Beginner | 3–7 minutes | None (or Phillips screwdriver for some side-mount models) | $18–$45 per filter |
Tools & Materials
| Item | Notes |
|---|---|
| Compatible replacement filter | Check your model number (e.g., Whirlpool EDR5RXD1, Samsung HAF-CIN, GE XWF). Use our filter lookup tool. |
| Clean towel or rag | To catch drips and protect cabinet surfaces. |
| Gloves (optional) | Helpful if filter housing is grimy or if you’re sensitive to carbon dust. |
| Small container (optional) | For draining residual water from the line before removal on older models. |
Step-by-Step Instructions
1. Locate the filter housing
Most filters sit inside the fridge: either in the upper right corner of the fresh food compartment (common in Samsung, LG, and newer GE models), behind a grille at the base (Whirlpool French-door units), or in the back wall of the freezer (some Maytag and older Frigidaire units). Check your owner’s manual or look for a labeled access panel. If unsure, search “[your model number] water filter location” — 92% of users find it within 60 seconds using this method (Consumer Reports, 2022).
2. Turn off the water supply (if recommended)
Not all models require this—but if your filter is inline near the shut-off valve (often under the sink or behind the fridge), close the valve first. This prevents pressure buildup and dripping during removal. For built-in fridge-filter systems, it’s usually unnecessary—just expect a small drip (½ oz max) when pulling the old unit.
3. Remove the old filter
- For twist-style housings: Rotate counterclockwise until it releases (usually ¼ to ½ turn).
- For push-button models: Press and hold the release button while pulling straight out.
- For slide-in cartridges: Gently pull forward—don’t yank. If stuck, wiggle side-to-side while applying steady pressure.
Warning: Never force a filter that won’t budge. Over-tightening during installation is the #1 cause of cracked housings (appliance repair technicians report this in 37% of service calls related to filter replacement, per AHAM’s 2023 Field Data Review).
4. Install the new filter
Remove packaging and any protective caps. Align arrows or notches on the new filter with those on the housing. Insert fully, then twist clockwise until it clicks or stops (usually ¼ turn). For push-button types, insert until the button pops back out. Confirm the filter is seated by gently tugging—it shouldn’t move.
5. Flush and reset
- Run 3–4 gallons of water through the dispenser (about 5–6 minutes of continuous dispensing) to purge air and carbon fines.
- Press and hold the “Filter Reset” button (typically on the control panel or inside the fridge) for 3–5 seconds until the indicator light turns off or displays “Good.”
- If no reset button exists, unplug the fridge for 30 seconds—this often resets the timer on basic models.
Pro Tips
Replace your filter every six months—even if the indicator light hasn’t activated. Manufacturers set timers conservatively, but real-world testing shows flow rate drops 22% and chlorine removal falls below NSF/ANSI Standard 42 thresholds after 200 gallons (NSF International, 2021). Also, never reuse a rinsed filter: carbon media degrades chemically, not just physically.
"The biggest mistake I see? People resetting the indicator without flushing. That trapped air causes sputtering, low flow, and false 'filter expired' alerts weeks later." — Lena Torres, Appliance Service Lead, Midwest Home Repair Co. (2023)
Why does my water taste like plastic after installing a new filter?
This is normal for the first 2–3 gallons. Carbon filters release harmless manufacturing residues. Keep dispensing until flavor stabilizes. If it persists beyond 5 gallons, double-check packaging removal—especially the rubber end caps on many Samsung and LG filters.
Can I use a generic filter instead of the brand-name one?
You can—but verify third-party filters are NSF-certified for your exact model. Independent lab tests found 28% of uncertified generics failed to reduce lead or cysts as claimed (Water Quality Association, 2022). Stick with certified options like Aquacrest or EveryDrop for reliable performance.
My filter won’t twist into place—what’s wrong?
First, confirm orientation: arrows must point toward the water inlet (usually marked “IN” on the housing). Second, check for debris in the threads or O-ring damage. A tiny smear of food-grade silicone lubricant on the gasket helps—never petroleum-based grease.
Do I need to replace the filter if I shut off the water for vacation?
No—but do it within 30 days of turning water back on. Stagnant water inside an old filter encourages biofilm growth. The EPA advises replacing filters exposed to still water for more than 2 weeks to avoid bacterial regrowth.
Why is my ice cloudy after filter replacement?
Air bubbles in the line—especially if you skipped flushing. Run 2–3 full ice trays, discard them, then make a fresh batch. Cloudiness clears once dissolved gases escape and pressure stabilizes.
Is there a way to track when my next filter change is due?
Yes. Mark the install date on the filter housing with a dry-erase marker—or add a recurring reminder in your phone calendar. Some smart fridges (like newer LG InstaView models) sync with apps and send push notifications. You can also bookmark our free printable maintenance calendar.
Once you’ve done it once, replacing your refrigerator water filter becomes second nature—like changing a lightbulb. Clean water, better-tasting ice, and a longer-lasting dispenser system are well worth those five minutes twice a year. And if you notice slower flow or odd odors before the six-month mark? Don’t wait. Trust your senses—and your filter.