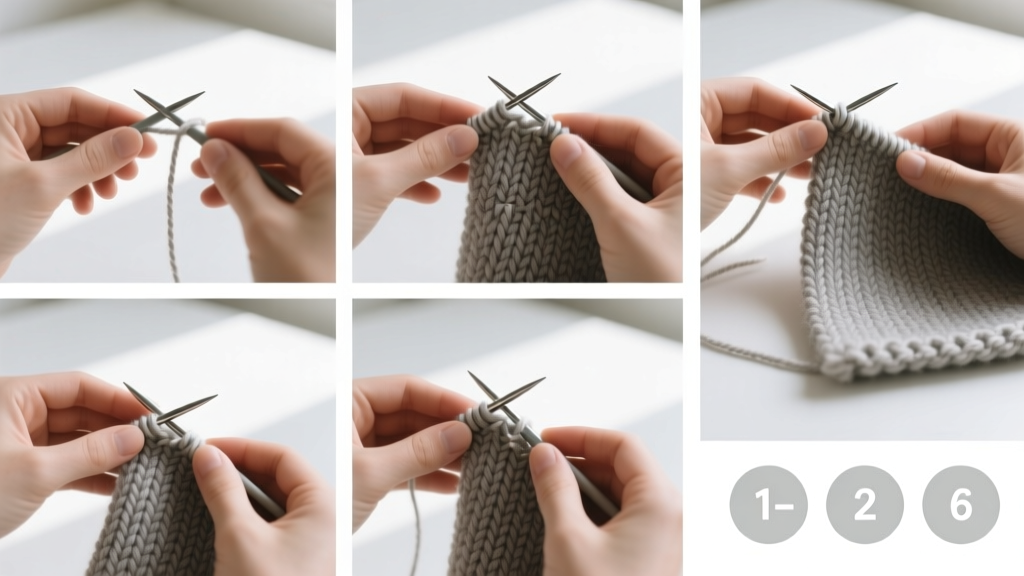
Knitting a scarf is the perfect first project for absolute beginners—it builds muscle memory, reinforces core stitches, and yields a wearable, satisfying result. With basic hand-eye coordination and about 8–10 focused hours over several days, you’ll create a soft, functional scarf using just two stitches and simple tools.
Overview
| Skill Level | Time Required | Tools Needed | Estimated Cost |
|---|---|---|---|
| Beginner (no prior knitting) | 8–10 hours total (can be broken into 30–45 min sessions) | Needles, yarn, scissors, tapestry needle | $12–$22 (budget-friendly acrylic or wool-blend) |
Tools & Materials
| Item | Specifications | Why It Matters |
|---|---|---|
| Knitting needles | Size I/9 (5.5 mm), straight, 14" long | Wider needles make stitch formation easier for new hands; wood or bamboo grips yarn better than metal for beginners |
| Yarn | Medium-weight (worsted #4), 100% acrylic or 80% acrylic/20% wool blend, ~200 yards | Acrylic is forgiving, affordable, and shows stitch definition clearly; avoid slippery silk or fuzzy mohair for first project |
| Scissors | Small, sharp fabric or embroidery scissors | Precise cuts prevent fraying and ensure clean yarn ends |
| Tapestry needle | Blunt-tip, large-eye needle (size 16–18) | Used to weave in ends without splitting yarn fibers |
Step-by-Step Instructions
Casting On: Start with 20 Stitches
Hold the needle in your right hand. Make a slipknot and place it on the needle—this counts as your first stitch. Use the long-tail cast-on method: leave a 6-inch tail, loop yarn over thumb and index finger, then pull the working yarn through with the needle. Repeat until you have exactly 20 stitches. Tip: Keep tension gentle—too tight makes knitting difficult; too loose causes uneven edges. Warning: Don’t count the slipknot as a stitch unless instructed by your chosen cast-on method.
Knit Every Row (Garter Stitch)
Hold the needle with stitches in your left hand. Insert the right needle front-to-back into the first stitch, wrap yarn counterclockwise around the right needle, then pull the loop through to the front. Slide the old stitch off the left needle. Repeat across all 20 stitches. Turn your work. Repeat this same row for every row—this is garter stitch, which lies flat and won’t curl. Tip: Say “in, around, through, off” as a mental cue for each motion.
Check Your Tension & Count Stitches Every 10 Rows
After every 10 rows, lay your work flat and count stitches. If you have more than 20, you’ve accidentally added a stitch (often by knitting into the strand between stitches). If fewer, you’ve dropped one (look for a horizontal ladder below a stitch). Fix errors within 2–3 rows—they’re much harder to correct later. Warning: Never rip back more than 5 rows without securing live stitches with a spare needle or stitch holder.
Binding Off: Finish Cleanly
When your scarf measures 60 inches (or your desired length), it’s time to bind off. Knit 2 stitches. Insert left needle into the first stitch on right needle, lift it over the second stitch and off the needle. Knit 1 more stitch, then repeat the lift-over. Continue until 1 stitch remains. Cut yarn, leaving a 6-inch tail, and pull it through the last loop. Tip: Bind off slightly looser than your knitting tension—pulling too tight creates a stiff, curled edge.
Pro Tips
Most beginner scarves fail not from poor technique—but from inconsistent tension and uncorrected mistakes piling up. According to knitting instructor and author Maggie L. R. D. in The Knitter’s Handy Book of Patterns (2022), “90% of first-scarf frustration comes from ignoring stitch counts past row 25—check early, check often.”
“If your scarf starts leaning left or right after 30 rows, you’re likely tightening the first or last stitch of each row too much. Try saying ‘breathe’ before inserting the needle into stitch #1 and stitch #20.” — Elena Torres, lead instructor at Brooklyn Craft Company, 2023
- Practice the knit stitch on scrap yarn for 15 minutes before casting on your scarf
- Use stitch markers every 5 stitches to visually segment your work
- Keep a small notebook: note date, rows completed, and any tension observations
What if my stitches look uneven or twisted?
This usually happens when you insert the needle incorrectly—going in back-to-front instead of front-to-back on knit stitches. Hold your work up to natural light and watch how the stitch sits on the needle: it should form a clean “V” shape. If it looks like a sideways “X”, the stitch is mounted backward. To fix, carefully re-mount it with the left leg forward before knitting.
Can I use circular needles instead of straight ones?
Yes—and many beginners find them more comfortable. Just ensure the cable is short (16") and use the same cast-on and knit-stitch technique. The scarf will lie flat on the cable while you work, reducing wrist strain. For more on tool options, see our guide on best knitting needles for beginners.
How do I keep track of rows without losing count?
Use a row counter (mechanical or app-based), or mark every 10th row with a safety pin clipped to the right edge. Another low-tech option: snap a photo with your phone after each milestone row and add a caption (“Row 30 – blue yarn end woven in”).
Why does my scarf get wider toward the bottom?
You’re likely adding extra stitches unintentionally—most often by knitting into the horizontal bar between stitches (a “bar increase”) or by failing to slide the stitch fully off the left needle. Double-check that only one stitch disappears from the left needle each time you complete a knit stitch.
What’s the best way to fix a dropped stitch several rows down?
Use a crochet hook sized to your yarn (usually 4.5–5.0 mm). Insert it into the dropped stitch from front to back, then catch the lowest exposed ladder rung and pull it through. Work upward, one rung at a time, until you reach the current row. For illustrated help, refer to our how to fix dropped stitches tutorial.
Should I block my finished scarf?
Yes—if using wool or wool-blend yarn. Wet-block by soaking in lukewarm water with a drop of wool wash, gently squeezing (don’t wring), rolling in a towel to remove excess water, then pinning to dimensions on a foam mat. Let air-dry 24 hours. Acrylic scarves benefit from steam blocking (hold iron 1" above fabric, no contact) to relax curling edges. See our full how to block knitted items guide for details.
Your first scarf won’t be perfect—and that’s part of its charm. The rhythm of the knit stitch becomes meditative with repetition, and each row builds confidence that transfers directly to hats, dishcloths, and sweaters. Keep your tension relaxed, your counts honest, and your yarn ends neatly woven—you’ve just joined generations of makers who began exactly where you are now.