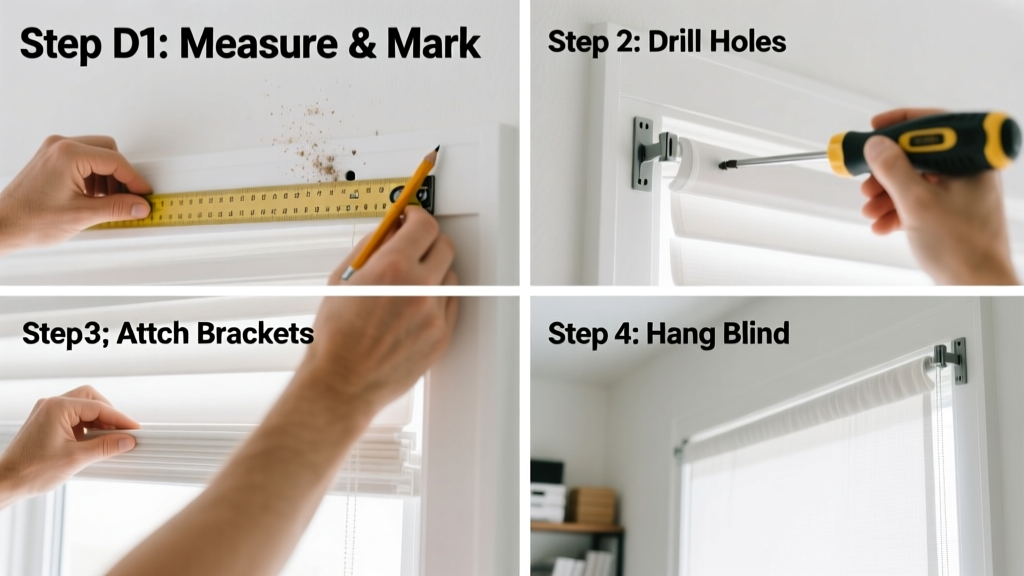
Installing blinds is a practical, satisfying home upgrade that boosts privacy, light control, and curb appeal. It’s a beginner-friendly project that typically takes 45–90 minutes per window, depending on mounting type and window count. With careful measurement and the right hardware, you’ll avoid crooked slats, rattling brackets, or blinds that won’t fully raise.
Overview
| Skill Level | Time Required | Tools Needed | Estimated Cost |
|---|---|---|---|
| Beginner | 45–90 min per window | Drill, level, tape measure, pencil, screwdriver | $25–$120 (blinds + hardware) |
Tools & Materials
| Item | Notes |
|---|---|
| Blinds (with mounting brackets) | Confirm type: vinyl, faux wood, aluminum, or cellular; match width/depth specs to your window |
| Drill with Phillips bit (and masonry bit if drilling brick/concrete) | A cordless drill with variable speed prevents overtightening screws |
| Steel tape measure (not cloth) | Measure twice: inside mount requires exact recess dimensions; outside mount needs 1.5" overlap per side |
| 3-foot bubble level | Essential for ensuring horizontal alignment—don’t rely on wall lines or tile grout |
| #8 x 1.25" wood screws (for drywall with anchors) or #10 x 2" lag screws (for wood frame) | Use toggle bolts for hollow-core doors or plaster walls without studs |
| Pencil and painter’s tape | Mark bracket positions lightly; use tape to outline rough placement before drilling |
Step-by-Step Instructions
1. Measure Your Window Accurately
For inside mounts: measure width at top, middle, and bottom of the window recess—use the narrowest measurement. Measure height at left, center, and right—use the longest. Subtract 1/8" from width to prevent friction. For outside mounts: add 3" total width (1.5" each side) and 2" height (1" top, 1" bottom) to allow full light blockage. Record all numbers clearly—don’t rely on memory.
2. Choose Mounting Type and Mark Bracket Positions
Decide between inside mount (cleaner look, requires ≥2.5" deep recess) or outside mount (better light control, works with shallow frames). Hold brackets against the header or casing, align them using your level, and mark screw holes with a pencil. Use painter’s tape to label left/right brackets—many kits are asymmetrical. Warning: Never mount directly into drywall without anchors unless hitting a stud—60% of blind failures stem from loose brackets (National Association of the Remodeling Industry, 2022).
3. Drill Pilot Holes and Secure Brackets
Drill pilot holes slightly smaller than your screws—1/16" for wood, 3/32" for drywall anchors. Insert anchors if needed (snap-in plastic for drywall, metal toggles for plaster). Tighten screws until flush—do not overdrive, which strips threads or cracks brackets. Double-check level across both brackets before proceeding.
4. Attach Blinds and Test Operation
Slide the headrail into the brackets’ slots or snap it in per manufacturer instructions (some require rotating latches). Gently lift and lower the blind 3–5 times to seat internal gears. Check for smooth travel, no binding, and full extension. If the blind tilts or catches, recheck bracket alignment—even a 2° angle causes uneven operation.
Pro Tips
Seasoned installers stress one thing above all:
“Measure for the blind, not the window. The difference between ‘almost right’ and ‘perfect’ is 1/16 inch—and that’s what separates silent operation from constant squeaking.” — Carla Mendez, Window Coverings Institute Certified Installer, 2023Avoid these common missteps: skipping the level check after bracket tightening (brackets shift when screws seat), using mismatched screws (shorter screws pull out; longer ones hit glass), and installing corded blinds near cribs (U.S. CPSC mandates cordless options in children’s rooms since 2022). Always test tilt and lift mechanisms before finalizing—some cellular shades require tension adjustment via small set screws on the headrail.
How do I install blinds on a metal door?
Use self-tapping metal screws (#8 x 3/4") and a cobalt drill bit. Pre-drill slowly to avoid warping. Mount only to the door’s reinforced top rail—not the thin skin. Consider adhesive-backed mini blinds as an alternative; they hold up to 5 lbs and avoid drilling entirely. See our guide on how to install blinds on metal doors.
Can I install blinds without drilling?
Yes—for temporary or rental situations. Tension rods work for some roller and Roman shades (max 36" width). Heavy-duty Command Strips (rated for 16 lbs) hold lightweight vinyl blinds on smooth surfaces—but never use them on windows exposed to direct sun or high humidity. For permanent no-drill solutions, explore magnetic blinds for steel-framed windows.
Why does my blind tilt unevenly?
Uneven tilt almost always traces to misaligned brackets or warped headrail. Loosen bracket screws just enough to shift position, then re-level and retighten. If the headrail bends easily when pressed, the blind is defective—contact the manufacturer. Don’t force adjustments; internal gear teeth can shear.
What’s the best blind type for a bathroom?
Faux wood or vinyl blinds resist moisture better than real wood or fabric. Look for PVC-coated lift cords and sealed slat edges. Avoid cordless spring-lift models in humid spaces—they corrode faster. For steam-heavy bathrooms, consider moisture-rated cellular shades like those tested by the best bathroom window coverings list.
How do I clean blinds after installation?
Wait 48 hours for adhesive or caulk (if used) to cure. Dust weekly with a microfiber duster or vacuum brush attachment. For deeper cleaning, wipe slats with a damp cloth and mild dish soap—never soak vinyl or faux wood. Aluminum blinds respond well to a vinegar-water spray (1:3 ratio) followed by immediate drying.
Do I need different hardware for ceiling-mounted blinds?
Yes. Ceiling mounts require longer screws (2.5" minimum) and often include L-brackets or universal pivot arms. Verify joist location with a stud finder—ceiling drywall alone can’t support most blinds. If mounting between joists, use 2x4 blocking screwed into adjacent joists first. Our ceiling-mounted blinds guide walks through structural reinforcement steps.
With precise measurement, thoughtful hardware selection, and attention to bracket alignment, installing blinds becomes less about guesswork and more about predictable, professional results. Most mistakes happen in the first 10 minutes—so slow down there. Once mounted, your blinds will deliver years of quiet, reliable function. And if you’re tackling multiple windows, tackle them in order of increasing complexity: start with a standard double-hung, then move to angled or arched openings.