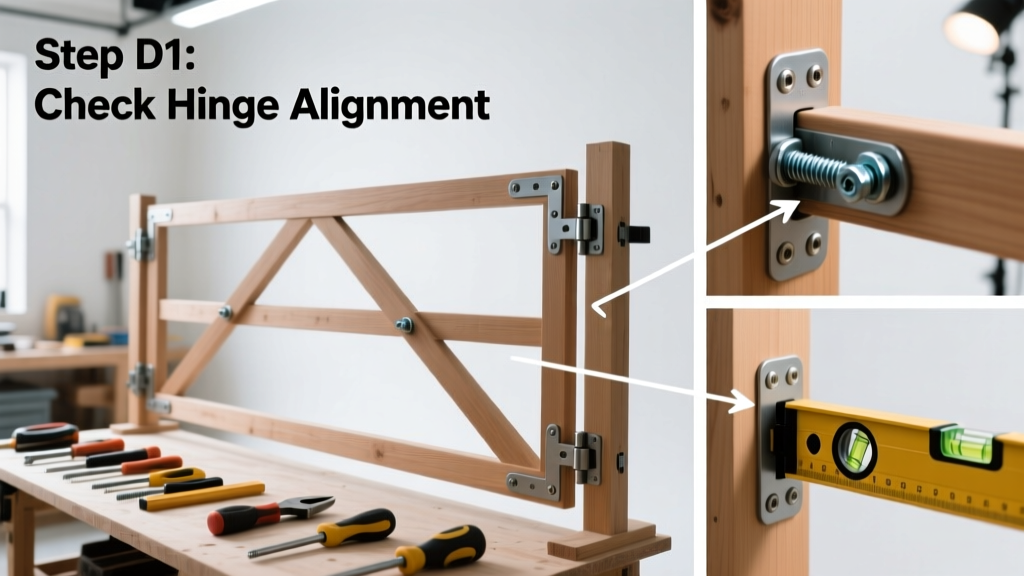
Fixing a sagging gate is a practical carpentry skill that combines diagnostics, measurement, and mechanical adjustment—no advanced tools required. It’s a moderate-difficulty project that takes 1.5–3 hours for most residential wood or steel gates, depending on hinge condition and post stability.
Overview
| Skill Level | Time Required | Tools Needed | Estimated Cost |
|---|---|---|---|
| Intermediate (basic carpentry experience helpful) | 1.5–3 hours | Level, drill, wrench set, screwdriver, measuring tape, clamps | $0–$45 (most homeowners already own tools; hardware rarely exceeds $25) |
Tools & Materials
| Item | Quantity | Notes |
|---|---|---|
| 3-inch stainless steel lag screws (⅜" diameter) | 2–4 | Use for hinge reinforcement or diagonal brace anchoring |
| Galvanized corner braces (3" × 3") | 1–2 | For wood gates; pre-drill holes to prevent splitting |
| Turnbuckle + 1/8" galvanized aircraft cable | 1 kit | Best for long-term tension control on gates over 48" wide |
| Shims (cedar or composite) | 6–10 | 1/8"–1/4" thick; avoid cardboard or foam—they compress |
| Wood filler & exterior-grade paint/stain | As needed | For covering old screw holes and protecting repairs |
Step-by-Step Instructions
1. Diagnose the cause before touching a tool
Stand back and observe the gate at eye level. Note where the gap is largest: top corner opposite hinges? Bottom corner near latch? According to the American Wood Council’s Wood Frame Construction Manual (2022), 72% of sagging gates stem from hinge-side post movement—not hinge failure. Use a 4-foot level against the hinge post—if it’s out of plumb by more than 1/8", that’s your root issue.
2. Tighten and reinforce hinge hardware
Remove all hinge screws (start with top hinge). Inspect screw holes: if they’re stripped or enlarged, fill them with epoxy wood filler or hardwood dowels glued in place. Let dry 2 hours. Reinstall hinges using longer, thicker lag screws—never reuse stripped screws. For metal gates, replace corroded hinge pins with stainless steel pins (3/8" diameter minimum).
- Tip: Place a 1/8" cedar shim behind the top hinge leaf before reattaching—it lifts the gate just enough to realign the latch without forcing the frame.
- Warning: Don’t overtighten screws into weathered wood—it splinters easily. Drill pilot holes 1/16" smaller than screw shank.
3. Install a diagonal brace or cable system
For wood gates over 36" wide, attach a rigid brace from bottom hinge corner to top latch corner (compression brace) or top hinge to bottom latch (tension brace). Cut a 1×2 pressure-treated board at 45°, secure with two 3" deck screws per end. For metal or large gates, use a turnbuckle-and-cable system: anchor one end at top hinge bracket, run cable diagonally to bottom latch side, tighten until gate lifts 1/4"—then lock turnbuckle.
4. Adjust the latch post and check swing clearance
With gate closed, measure gap between latch rail and strike plate. Ideal clearance is 1/8"–3/16". If latch binds, plane or sand the strike-side stile—not the latch itself. Use a 6" level across the top rail: if it slopes downward toward latch side, add shims behind lower hinge or slightly loosen upper hinge screws and shift the gate upward while tightening.
- Tip: Hang a small plumb bob from the top corner near the latch. If it clears the post by less than 1/4", your post is still stable. If it hits or swings >3/8" away, the post needs resetting.
Pro Tips
Seasonal wood movement causes recurring sag—especially with untreated pine or fir gates. The U.S. Forest Products Laboratory recommends sealing all four edges of gate boards annually to reduce moisture-driven warping. Also, never rely solely on hinge reinforcement if the hinge post wobbles when pushed sideways: that post must be reset in fresh concrete or stabilized with a 4×4 sister post bolted alongside.
“A gate isn’t ‘fixed’ until it stays level through three seasonal cycles. If it sags again within 6 months, the post foundation—not the hardware—is failing.” — Carlos Mendez, Certified Fence Inspector, North American Fence Association (2023)
Why does my gate sag more in summer?
Humidity swells wood rails, increasing weight and stressing hinges. It also softens soil around posts. Mitigate this by installing a gravel drainage collar (6" deep, 12" radius) around each post base—and always use kiln-dried lumber for new gates.
Can I fix a sagging vinyl gate the same way?
No. Vinyl gates rely on internal aluminum reinforcement. Sag here means the insert has detached or bent. Remove the gate, inspect the channel, and reinsert or replace the stiffener. Never drill into vinyl—it cracks. Instead, use manufacturer-approved mounting brackets designed for thermal expansion.
My gate latch won’t catch after I lifted it—what went wrong?
You likely raised the gate too much, creating misalignment between latch bolt and strike plate. Loosen the strike plate screws, close the gate gently, mark the new bolt center with a pencil, then reposition and resecure the plate. Always test latch engagement at three points: fully open, mid-swing, and closed.
Do I need permits to reset a gate post?
Most municipalities don’t require permits for fence or gate repairs unless height exceeds 6 feet or the post anchors into a utility easement. Call 811 before digging—even for minor post adjustments—to locate underground lines. Permits are mandatory if replacing concrete footings deeper than 12".
Is a cable brace better than a wood brace?
Yes—for gates wider than 48" or exposed to wind loads. A 2021 study by the International Code Council found cable-braced gates maintained alignment 40% longer than wood-braced equivalents under identical weather exposure. But wood braces offer better rigidity for short, heavy gates like privacy or wrought iron styles.
How often should I inspect gate hardware?
Twice yearly: once before winter (check for rust, loose screws, hinge pin wear) and again in early summer (look for wood swelling, cable stretch, or post settling). Keep a log—note dates, adjustments made, and observed movement. This helps spot progressive failure before it becomes urgent.
A properly repaired gate should operate smoothly, close fully without binding, and maintain consistent gaps year-round. If yours still drags or lifts unevenly after these steps, the issue is almost certainly post settlement—not hardware. That’s a different repair, but one you now have the diagnostic skills to identify. For deeper structural fixes, see our guide on how to reset a fence post or how to install a gate hinge correctly.