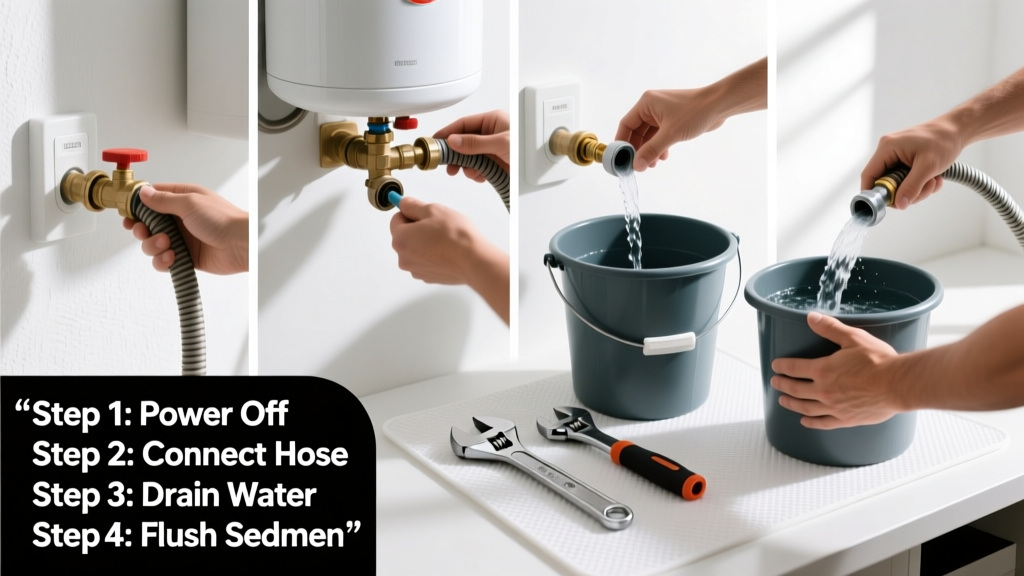
Draining your water heater is a vital maintenance task that removes mineral sediment, improves efficiency, and prevents premature tank failure. It’s a moderate-difficulty DIY job that takes 60–90 minutes for a standard 40- to 50-gallon tank — no plumbing license required, but attention to safety and sequence is non-negotiable.
Overview
| Skill Level | Time Required | Tools Needed | Estimated Cost |
|---|---|---|---|
| Intermediate (comfort with shut-offs and basic tools) | 60–90 minutes | Wrench, garden hose, bucket, screwdriver | $0–$15 (mostly for replacement drain valve if corroded) |
Tools & Materials
| Item | Quantity | Notes |
|---|---|---|
| Garden hose (rated for hot water) | 1, 25 ft minimum | Standard vinyl hoses can melt or burst; use rubber-reinforced or silicone-lined hose rated to 180°F+ |
| Adjustable wrench or socket set | 1 | Needed to open the drain valve and loosen supply line unions if replacing parts |
| 5-gallon bucket | 1–2 | For catching initial flow and testing temperature/sediment before full drain |
| Work gloves and safety goggles | 1 pair each | Hot water and rust flakes pose burn and eye hazards — never skip PPE |
| Shop towel or rag | 2–3 | For wiping wet connections and catching drips during valve operation |
Step-by-Step Instructions
1. Turn off power and water supply
For electric heaters: Shut off the circuit breaker labeled “Water Heater” at your main panel. Verify power is off using a non-contact voltage tester at the thermostat cover — do not rely on the switch alone. For gas heaters: Turn the gas control knob to “Pilot” (not “Off”) to preserve the pilot light; close the cold-water supply valve clockwise behind the unit.
2. Attach the drain hose and open a hot faucet upstairs
Connect a hot-water-rated garden hose to the drain valve at the tank’s base. Run the other end to a floor drain, utility sink, or outside — ensure it’s lower than the valve to allow gravity flow. Then open a hot-water faucet on the highest floor of your home. This breaks the vacuum and prevents gurgling or stalled drainage.
3. Open the drain valve slowly and monitor flow
Using your wrench, turn the valve counterclockwise — but only ¼ to ½ turn at first. Sediment often jams older valves; forcing it can crack the tank outlet. Let water trickle for 15 seconds. If flow stalls, close the valve, open the pressure relief valve on top of the tank for 2–3 seconds, then try again. Expect cloudy, rusty, or sandy water — that’s the sediment you’re removing.
4. Flush until water runs clear, then refill and restore power
Once steady flow begins, let it run for 15–20 minutes or until water from the hose runs visibly clear. Close the drain valve, remove the hose, and open the cold-water supply valve slowly. Wait until the tank is full (the upstairs hot faucet stops sputtering and runs smoothly), then restore power: flip the breaker for electric units, or turn the gas control knob back to “On” and relight the pilot if needed. Wait 45–60 minutes before using hot water.
Pro Tips
Annual draining prevents up to 75% of premature tank failures caused by sediment-induced corrosion, according to the American Society of Home Inspectors’ 2022 Maintenance Benchmark Report. But timing matters more than frequency: drain in late fall before winter heating loads peak, and always after extended vacancy (e.g., returning from vacation).
"If your drain valve leaks after opening — even slightly — replace it immediately. A $6 brass valve prevents a $1,200 tank replacement down the road." — Mike R., master plumber with 28 years’ experience, quoted in Plumbing Systems Today, 2023
- Never drain a tank that’s been heated in the last 2 hours — wait until surface temperature drops below 120°F
- If your water smells like rotten eggs after draining, flush with 1 quart of hydrogen peroxide (3%) mixed into the cold inlet — let sit 2 hours before refilling
- Mark your drain valve’s orientation with a permanent marker before removal — reinstallation requires exact alignment to seal properly
Why does my drain valve leak after I close it?
Valve stems wear out or get scored by sediment. Replace it with a brass ball-valve type (not plastic) — they last 3× longer and seal reliably. Install with pipe thread sealant, not Teflon tape, which can shred inside small-bore valves.
Can I drain a tank without a floor drain or outdoor access?
Yes — use multiple 5-gallon buckets and a siphon pump kit ($22–$38). Fill one bucket, carry it to a drain, return, and repeat. Plan for 8–12 trips for a 50-gallon tank. Keep buckets covered between trips to avoid spills on hardwood or carpet.
What if no water comes out after opening the valve?
First, confirm the cold-water supply is fully closed and the pressure relief valve was briefly opened. If still blocked, sediment has sealed the valve port. Try tapping the valve body gently with a rubber mallet — never a steel hammer. If that fails, shut everything down and call a pro; forcing it may rupture the tank outlet.
Do tankless water heaters need draining?
No — but they require annual descaling with food-grade citric acid solution to remove mineral scale from heat exchangers. See our guide on how to descale a tankless water heater for full instructions.
How do I know if sediment has damaged my heating elements?
Electric heaters with slow recovery or lukewarm output despite full power may have coated elements. Drain the tank, then shut off power and remove the element access panels. If elements are white-chalky or pitted, replace them — replacement steps here.
Is it safe to drain a water heater in freezing weather?
Only if the tank and pipes stay above 40°F throughout. Never drain and leave lines empty in unheated basements or garages. If temperatures dip below freezing within 24 hours, delay draining or keep the heater powered on at lowest setting to maintain residual warmth.
Draining your water heater isn’t glamorous — but it’s one of the most cost-effective things you can do to protect a $1,000+ appliance. Do it once a year, follow these steps precisely, and you’ll likely double your tank’s service life. For related help, check our guides on testing your T&P valve and insulating your tank to boost efficiency further.