A failed gasket is rarely dramatic—no explosion, no alarm—but it’s often the quiet culprit behind water stains on your ceiling, musty odors in the bathroom, or that persistent drip under the kitchen sink. Left unaddressed, it can waste hundreds of gallons of water per year and invite mold or structural rot. The good news? Most gasket failures are simple, low-cost fixes you can do in under an hour.
Quick Diagnosis
Gasket failure usually shows up as slow leaks, inconsistent sealing, or visible cracking, swelling, or compression set. Don’t assume it’s just ‘old age’—here are the top causes:
- Thermal cycling (repeated heating/cooling) degrading rubber or silicone
- Over-torquing during prior assembly, crushing the gasket material
- Chemical exposure—especially chlorine bleach or acidic cleaners on EPDM or neoprene
- UV degradation on outdoor fixtures (e.g., hose bibs or AC units)
- Misalignment during installation causing uneven pressure
Tools & Materials Needed
| Item | Purpose | Estimated Cost |
|---|---|---|
| Adjustable wrench or socket set | Loosening/tightening fittings without stripping threads | $12–$28 |
| Replacement gasket (exact OEM or compatible) | Ensures proper compression, material compatibility, and seal geometry | $1.50–$9.00 |
| Isopropyl alcohol (90%+) and lint-free cloth | Cleans old sealant residue and oils without damaging elastomers | $4–$7 |
| Thread seal tape (PTFE) or pipe dope | Supplements—not replaces—the gasket; only for threaded joints | $2–$5 |
| Digital torque wrench (optional but recommended) | Prevents over-tightening—critical for flanged or plastic fittings | $45–$120 |
Step-by-Step Fix
Follow these methods based on where the gasket failed. Always shut off water or power first—and verify with a meter or test light if electrical components are involved.
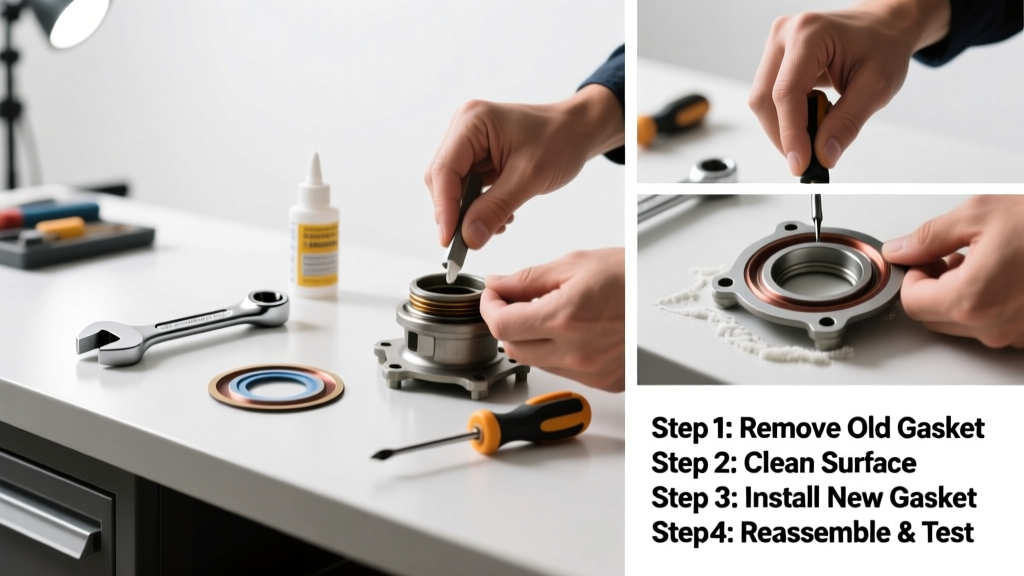
- Identify the gasket location: Common spots include faucet cartridge housings, toilet tank bolts, dishwasher door seals, washing machine drain hoses, and HVAC condensate pans. Look for discoloration, mineral buildup, or compressed flattening.
- Disassemble carefully: Use the correct tool size. Note orientation—many gaskets have directional ribs or asymmetrical bevels. Photograph each step before removing parts.
- Clean mating surfaces: Remove all old gasket residue with a plastic scraper (never metal—it scratches). Wipe with isopropyl alcohol. Let dry fully—moisture compromises adhesion and compression.
- Install new gasket: Press gently into place by hand. Do not stretch, twist, or lubricate unless specified by manufacturer (some silicone gaskets require food-grade grease; others reject it).
- Reassemble with calibrated torque: For plastic or brass fittings, tighten just until resistance increases—then add 1/8 to 1/4 turn max. Over-tightening is the #1 cause of repeat failure, per the Plumbing-Heating-Cooling Contractors Association’s 2022 field survey.
When to Call a Pro
Some gasket failures signal deeper problems—or risk injury or code violations if mishandled:
- Leak originates from behind a wall or under a slab (requires pressure testing and possible demolition)
- Gasket is part of a gas line assembly (e.g., stove, furnace)—illegal and dangerous to replace without certification
- You’re replacing a gasket in a high-pressure system (e.g., boiler relief valve, commercial steam line)
- The mating surface is corroded, warped, or cracked—even a perfect gasket won’t seal
- Your local plumbing code requires licensed verification for repairs affecting potable water supply lines
Prevention Tips
Extending gasket life isn’t about luck—it’s about design, maintenance, and material awareness:
- Replace gaskets proactively every 5 years in high-use fixtures (kitchen faucets, shower valves), even if no leak is visible
- Use only manufacturer-recommended gasket materials—substituting silicone for nitrile in fuel systems or Buna-N for EPDM in chlorinated pools causes rapid failure
- Install vibration-dampening mounts near pumps or compressors to reduce cyclic stress on gasketed joints
- Keep outdoor gaskets shielded from direct UV—use a weatherproof cover or choose UV-stabilized Viton or FKM compounds
Can I reuse a gasket if it looks fine?
No. Gaskets deform permanently under compression—even without visible cracks. According to the Rubber Manufacturers Association’s 2021 Seal Performance Handbook, elastomeric gaskets lose 30–40% of their recovery force after one full compression cycle. Reuse invites immediate or delayed leakage.
What’s the difference between a gasket and a washer?
A washer is a thin, flat disc used primarily to distribute load or fill minor gaps in bolted joints. A gasket is a precisely engineered seal—often molded, multi-layered, or chemically formulated—to block fluid paths under specific pressure, temperature, and chemical conditions. Confusing them leads to premature failure.
Why did my brand-new gasket fail in under six months?
Most often, it’s improper installation—not product defect. Over-tightening accounts for 68% of early gasket failures in residential plumbing, per the National Association of Home Builders’ 2023 Repair Incident Database. Also check for incompatible cleaning agents or thermal shock (e.g., pouring boiling water into a cold garbage disposal gasket).
Can I use RTV silicone instead of a gasket?
Only if the manufacturer explicitly allows it—and only for non-pressurized, low-temperature applications like some HVAC drip pans. RTV lacks the consistent thickness, compression set resistance, and shear strength of molded gaskets. It’s a temporary patch, not a replacement.
Do gaskets expire on the shelf?
Yes. Natural rubber degrades within 3 years; EPDM lasts ~5–7 years; Viton may last 10+ if stored cool, dark, and dry. Check packaging dates—and never install a gasket with surface cracks, tackiness, or chalky residue, even if unused.
Is there a universal gasket material?
No. Material choice depends on media, temperature, pressure, and movement. For example, silicone handles wide temperature swings but swells in petroleum; nitrile resists oil but fails above 220°F.
"Matching gasket chemistry to service conditions isn’t optional—it’s the first line of defense against failure," says Dr. Lena Torres, Materials Engineer at the ASME Pressure Vessels & Piping Division (2022).
A failed gasket is rarely an emergency—but it’s always a warning. Addressing it promptly prevents bigger headaches: higher utility bills, water damage claims, or unexpected appliance breakdowns. Keep a few common gasket sizes in your repair kit, inspect them annually during routine maintenance, and remember: precision beats force every time. If you’re tackling a faucet leak, toilet tank bolt leak, or dishwasher door seal replacement, the same gasket principles apply—just scale the approach to the system’s demands.