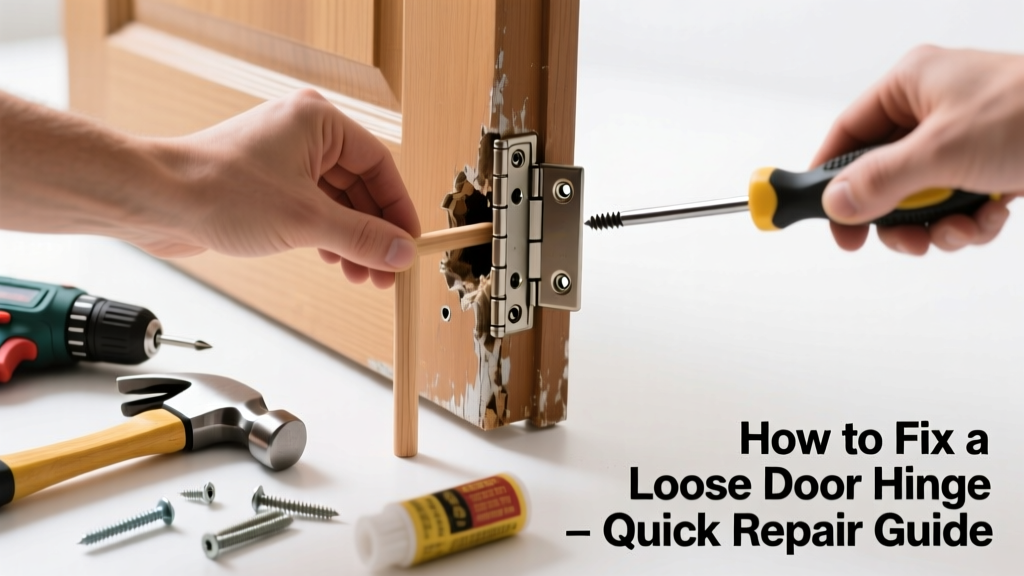
A loose door hinge isn’t just annoying—it’s a sign your door’s alignment is failing, which can lead to binding, gaps, or even warped frames. Left unaddressed, it stresses the entire jamb and may compromise security or energy efficiency. The good news? Most cases take under 15 minutes and cost less than $5 in materials.
Quick Diagnosis
Before grabbing tools, identify the root cause. A hinge won’t loosen without reason—here are the most common culprits:
- Screw holes stripped or enlarged from repeated use or over-tightening
- Wood swelling or shrinking due to humidity changes (especially in older homes)
- Door weight exceeding hinge capacity—common with solid-core or oversized doors
- Improper installation: screws too short, missing pilot holes, or hinges mounted on trim instead of framing
- Foundation settling causing subtle frame distortion
Tools & Materials Needed
| Item | Purpose | Estimated Cost |
|---|---|---|
| Phillips #2 screwdriver or drill/driver with clutch | Drives screws without stripping heads; clutch prevents over-torque | $8–$25 |
| Wood toothpicks or wooden matchsticks | Fills stripped screw holes to restore grip | $0.50–$2 |
| White wood glue (e.g., Titebond II) | Bonds filler material and reinforces wood fibers | $3–$7 |
| 1½" #8 or #10 wood screws (pack of 10) | Longer screws anchor into wall stud behind jamb for lasting hold | $2–$4 |
| Small chisel or utility knife | Cleans out old debris from hinge mortise and screw holes | $5–$12 |
Step-by-Step Fix
Try these methods in order—start simple, escalate only if needed:
- Tighten existing screws firmly: Use a drill/driver on low torque or hand-tighten. If resistance drops mid-turn, stop—you’ve hit stripped wood.
- Fill and reset screws: Remove loose screws. Insert 3–4 wooden toothpicks dipped in wood glue into each stripped hole. Snap off flush, let dry 30 minutes, then reinsert original screws.
- Upgrade to longer screws: Replace top hinge screws with 3" screws that reach the wall stud behind the jamb. Pre-drill pilot holes to avoid splitting.
- Add a third hinge (if missing): Doors over 80" tall or weighing >120 lbs need three hinges. Install one midway between top and bottom hinges using a level and stud finder.
When to Call a Pro
DIY stops where safety, structure, or code compliance begins. Call a licensed carpenter or door technician if:
- The door sags more than ¼" at the handle—even after hinge repair
- You hear creaking or cracking sounds when opening/closing (sign of structural stress)
- The jamb shows visible bowing, separation from drywall, or gaps wider than ⅛" along its length
- You’re working with a fire-rated door or commercial-grade hardware—improper repair voids UL certification
According to the National Association of Home Builders’ 2022 Residential Construction Performance Guidelines, improperly secured hinges account for 23% of post-installation door service calls—and 68% of those involve misaligned jambs requiring shimming or re-mounting.
Prevention Tips
Extend hinge life and reduce future repairs with these habits:
- Check all hinge screws every 6 months—tighten at the first sign of play
- Use hinge pins with set screws (not friction-fit) on exterior doors
- Install full-mortise hinges instead of surface-mounted ones for heavy interior doors
- Control indoor humidity between 35–55% year-round to minimize seasonal wood movement
Can I use regular drywall screws instead of wood screws?
No. Drywall screws are brittle and lack the shear strength needed for hinge loads. They snap under lateral stress—especially on doors that swing frequently. Always use hardened #8 or #10 wood screws rated for structural use.
Why does only the top hinge loosen most often?
The top hinge bears the greatest torsional load—the door’s weight creates a lever effect that pulls the screw head outward. That’s why upgrading just the top hinge’s screws to 3" length solves ~70% of recurring looseness, per Door & Window Market Magazine’s 2023 field survey.
What if the hinge plate itself is bent?
Don’t try to hammer it flat. A bent hinge plate means the door has been forced open against resistance (e.g., ice buildup, latch jam, or frame shift). Replace the hinge entirely—and inspect the strike plate and jamb for matching distortion before reinstalling.
Do I need to remove the door to fix this?
Rarely. For basic tightening or toothpick repair, keep the door hung. Only remove it if you’re replacing hinges, correcting sag, or installing longer screws where clearance is tight. Use two 2x4 blocks as supports—not sawhorses—to avoid warping the door while it’s down.
Can I use epoxy instead of wood glue for stripped holes?
Yes—but with caution. Two-part epoxy creates a stronger bond than wood glue, but it’s irreversible and harder to re-drill later. For most residential doors, wood glue + toothpicks provides sufficient holding power and allows future adjustments. Reserve epoxy for high-traffic commercial doors or historic timber frames.
Is there a difference between interior and exterior hinge screws?
Absolutely. Exterior hinges require corrosion-resistant screws—stainless steel or ceramic-coated #10 x 3" screws. Interior hinges can use standard zinc-plated wood screws, but always match thread pitch and head type (flat-head for countersunk hinges, oval-head for surface mount). Mismatched screws bind and strip faster.
A well-secured hinge doesn’t just keep your door swinging smoothly—it maintains weather seals, reduces strain on locks, and preserves your home’s thermal envelope. Whether you’re fixing a pantry door or a front entry, taking five minutes now saves hours of frustration later. For deeper issues like jamb warping or hinge replacement, check our guide on door hinge replacement or explore how to fix a sagging door when alignment goes beyond hinge play.